Designing the Measure Collection
After finishing the desk shelf system design, our lead designer Sean Kelly was inspired to consider the tools on your desk, starting with a ruler. Rulers measure. They straighten. They give you bearing. But Sean was curious to incorporate new forms and new processes that we had developed over the years, to design a measuring tool that was quite a bit different.
SEAN KELLY (Lead Product Designer): A ruler is an obvious part of the workspace. I was excited to push the design and take what we’d learned in metal machining to make something unique.


Ruler Ruler, on the Wall
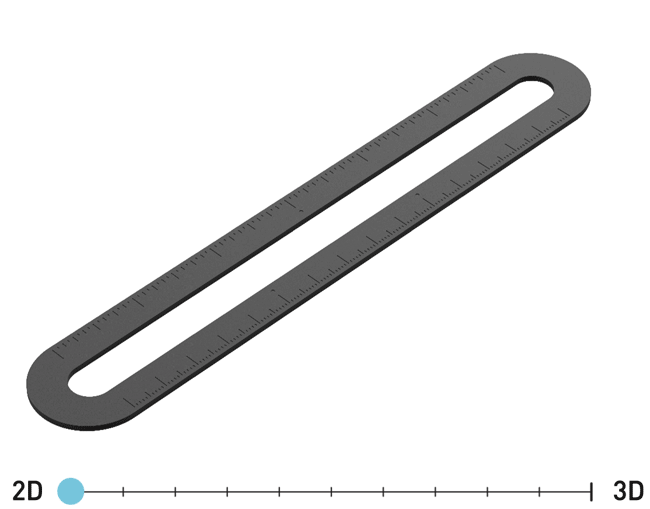
Most rulers are punched flat from sheet metal. It’s efficient and inexpensive—a flat ruler measures well and helps you draw straight lines. Functionally, you’re kinda all set. But we wanted our ruler to stand out.
Sometimes, you need to go all-in on the form of a product, to build something that couldn’t exist otherwise.
Each design has a point where we weigh the benefits and costs of form and function. Each product takes us in different directions. With our desk shelf system, functional innovation was our guiding light. With our speaker, we focused on the form. Some of our favorites (like the catch-all) fall nicely in the middle, a balance of innovative function and sculptural form. We weren’t trying to revolutionize the functionality of measuring, but rather creating something that you couldn’t find anywhere else.
KEN TOMITA: The point of the ruler was to make something beautiful, and eye catching, something you’d want to leave out on your desk or hang on your wall.


With an idea in mind, we started to sculpt! The shapes and contours of the ruler emerged, and were influenced by the other products that use machined metal: the key ring, the minimalist wallet, and the minimalist knife.


Sean and Elise, our design intern, pulled the design from two dimensions into three, and applied our experience working with machining to create a form that stood out from the desktop, with subtle functional features. The curves and chamfers made for easy manipulation, gave a resting place for a pen, and gave a vertical surface to cut against. And, it made an object we loved to look at.
We arrived at the basic three dimensional shape in time to hunker down for the hectic holiday season. Setting the design aside, we used prototypes at our desks and mulled over what would become of the idea.


A Collection
Months later, we revisited the ruler and decided it should be part of a collection: a ruler, protractor, and triangle, a stable trio of tools.
SEAN KELLY: The measure collection was a cool way to apply similar design forms and features to several different shapes at once—it’s obvious they go together, but each one brought a different challenge.
Since the shape was basically refined, our design team moved on to the hard part—the markings. We considered all the ways to create markings that were as interesting as the form. From line weight, to spacing, to numerals or symbols, we went through a huge number of mockups.


The easy way to make the marks is to laser etch or print them onto the surface. With the measure collection, however, we wanted markings that supplemented the form, and that interacted with the three dimensional shape. The only way to do this also happens to be much more difficult - you machine the marks directly into the metal surface. It allows us to control the depth, width, and shape of the marks in a way that the other processes can’t.
To refine the marking design, we had to create a full scale prototype in the final material and finish. It was the only way to really see how the marks and the form interact. Modeling software wouldn’t be enough.
To refine the marking design, we had to create a full scale prototype in the final material and finish. It was the only way to really see how the marks and the form interact. Modeling software wouldn’t be enough.

The plate in the photo above shows the prototype. It has 12 sections of the triangle design, each with a different combination of marks. By using four different machining tools, we were able to create tiny, incremental differences between each section and compare dozens of different markings. Even holding the prototype in hand, it’s difficult to see the subtle gradations, with changes in cut depth as small as 0.0003” of an inch. (That’s about ⅓ the width of a human hair!) We pored over the prototype until we could pick the markings that were just right.


From here, it was on to rounds of prototyping to dial in the process. The quality of the machining is paramount—just like with our keyring and minimalist knife, it has to be exceptional. How the measure collection is made is integral to the design itself. The finished products are all about form and shape, and about how manufacturing and design go hand in hand.
“Having the measure collection fully machined was a challenge, but the end result is worth it. The marks and overall form couldn’t be more seamless."
KEN TOMITA
Co-Founder


Three to Tango
The ruler, protractor and triangle were designed together, each informing the next. Balance, symmetry, completeness—all achieved with the set. Each is available individually as well.